Images are a topic we could spend a lot of time on, but I’m just going to cover the basics. The videos and links included go into more detail on certain topics. As usual, the whole Introduction to WordPress series:
1. Logging in and getting around
2. Creating and editing posts and pages
3. More aspects of posts and pages
4. Inserting images into posts and pages – you are here
5. Comments and your account
6. Widgets (sidebar content)
Inserting images into posts and pages
WordPress has a nice automatic way to manage images. All of the images and other files you’ve ever uploaded into your site via WordPress will be in the Media Library, available to be used again later if you’d like. You can upload them either from Media → Add New or from the Add Media button above the editing box for any post or page; the latter allows you to choose previously uploaded images as well.
Clicking Add Media brings up a large box overlaying your editing screen. After you upload or when you select an image from the library, the right side of the box will give you options for the image and how it appears, shown below. The first four options are Title, Caption, Alt Text, and Description; they stay with the image from use to use (though they can be altered at any time). The alt text is perhaps the most important – it appears within the HTML image tag and appears if the image somehow can’t; it is also used by screen readers and search engines as a description of the image. The rule of thumb is that if the image is wrapped in a link, the alt text should describe the destination of the link. If the image conveys information, the alt tex should repeat that information. If the image is purely decorative, however, feel free to leave the alt text blank.
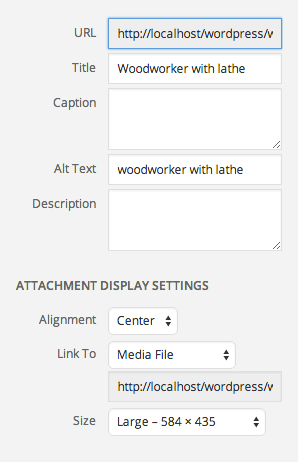
The Caption is optional but will display with the image in your post or page if it is filled in. The Title and Description are used in the Attachment Page; Attachments, of which images are one kind, are actually in the same class as Posts and Pages, and so each has an individual page devoted to it. For more on the first four options, collectively called metadata, see Morten Rand-Hendriksen’s post Harnessing the Power of WordPress Image Metadata.
After those four options there are three more, which only affect this particular use of the image: Alignment, Link To, and Size. Alignment is the left-right positioning of the image. Left, Center, and Right are fairly self-explanatory; for Left and Right the text will flow into the empty space next to the image, if there is enough of it. None is like Left but without text flowing into the space. Link To is for images that should be clickable. A logo for an event you’re planning could have a Custom Link to the event page; if you’ve gotten into writing good descriptions you could link to the Attachment Page; purely decorative images or those already shown at their largest size could have no link; or you could link directly to the largest size of the image. That last is often required for lightboxing to work.
A word on image sizes: when you upload, WP will generate a bunch of smaller size options for the image, which you can then use in your posts and pages (along with the full-size one). This lets you put images into smaller spaces without forcing visitors to load a file that is way bigger than necessary. You choose which size to insert with the last option in the image insertion window.
If you decide to change the size or link, I find it quickest to delete the inserted image and reinsert it. If you want to change the alignment, it’s quick to go into the Text editor and change among alignnone, alignleft, aligncenter, and alignright.
iThemes has two relevant videos here, the first about inserting images and the second about the Media Library:
And as a final note, remember to make sure you have the rights to use any images you want to put on your site. The easiest way to do that with images you didn’t create yourself is by drawing from a stock of freely licensed photos. The sites I use for that purpose most often are Pixabay and Wikimedia Commons (the former you can use with abandon; the latter generally require attribution), and you can find a huge number of additional options on my Pinterest board Color & Images.